martes, 11 de octubre de 2016

Asterisk + FreePBX + cisco 8841 y 7821

Despues de mucho buscar y buscar, probar y probar configuraciones pude hacer funcionar mi cisco ip phone 8841.

Version de Asterisk:   Asterisk 11.10.2
Version de FreePBX:   12.x.x.x

Debes tener tu DHCP configurado para tener TFTP y asi el telefono pueda encontrar el server TFTP, en mi caso lo puse en el mismo server asterisk.

Lo primero que hay que hacer es configurar Asterisk + FreePBX para que funcione con TCP, ya que estos telefonos trabajan asi, por UDP de plano no se puede.

Configuracion de FreePBX

Asterisk SIP Settings - Chan SIP


Al aplicar los cambios debe quedar habilitado Asterisk para TCP y UDP, verificamos asi:


En la extension creada hay que cambiar que primero busque conectarse por TCP


Archivo SEP.XML  (logico si estas haciendo esto sabes como debe llamarse el archivo....que no es el que puse)

Para descargar el archivo ir a:

https://mega.nz/#!Kq4HnKaa!0wvmgekY8Xk1sYkY-IM32Ik2dh3RHSgKQOj0XOzHk58


Reinicias el telefono y listo.

Referencias: https://community.spiceworks.com/topic/1335724-cp-8851-on-asterisk?page=1
Referencias: http://docs.acsdata.co.nz/asterisk-cisco/sepmac-cnf-xml.shtml

viernes, 26 de agosto de 2016

Creacion de particion LVM en linux por consola.

En esta ocasion configuraremos una particion LVM de un linux ya existente.

Revisamos que particiones existen:

[root@files ~]# fdisk -l

Disk /dev/xvda: 42.9 GB, 42949672960 bytes, 83886080 sectors
Units = sectors of 1 * 512 = 512 bytes
Sector size (logical/physical): 512 bytes / 512 bytes
I/O size (minimum/optimal): 512 bytes / 512 bytes
Disk label type: dos
Disk identifier: 0x0004cf00

    Device Boot      Start         End      Blocks   Id  System
/dev/xvda1   *        2048     1026047      512000   83  Linux
/dev/xvda2         1026048    83886079    41430016   83  Linux

Disk /dev/xvdb: 1073.7 GB, 1073741824000 bytes, 2097152000 sectors
Units = sectors of 1 * 512 = 512 bytes
Sector size (logical/physical): 512 bytes / 512 bytes
I/O size (minimum/optimal): 512 bytes / 512 bytes


Disk /dev/xvdd: 119 MB, 119212032 bytes, 232836 sectors
Units = sectors of 1 * 512 = 512 bytes
Sector size (logical/physical): 512 bytes / 512 bytes
I/O size (minimum/optimal): 512 bytes / 512 bytes

Centos 7 y firewall-cmd

Con las recientes actualizaciones de Centos trae como novedad el firewall-cmd que es una manera de usar iptables para mi gusto mas simple que las largas lineas que se ponían.

Por default en la instalación viene activado lo cual puedes desactivar o usarlo si quieres.

A continuación veremos comandos mas usados para el uso de firewall-cmd desde la consola de linux en Centos.

Saber si esta corriendo el firewall:

[root@files ~]# firewall-cmd --state
not running


Arrancar el servicio:

[root@files ~]# systemctl start firewalld.service

Revisamos

[root@files ~]# firewall-cmd --state
running


martes, 26 de julio de 2016

Final de MadMen.


Acabo de terminar la serie de MadMen, una de mis favoritas....la segui casi desde que inicio, me llamaba mucho la atención como era el marketing en aquellos años.

El final esta entre lo epico y lo increible....mas que nada por lo que sugiere.

Serie 200% recomendada para verla.

Se me antojo un refresco.....   :P


Rising Hope en Netflix !

Excelente opcion para ver las 4 temporadas en Netflix, tuvo sus picos pero siempre se mantuvo a muy buen nivel, me parecio muy bueno el casting.


Esta serie ya salio del aire (no se por que) y me parece muy buena. 

Martha Plimpton es una excelente actriz con muchas tablas por toda la familia que se dedica a esto.


Como pasar un fortigate a modo interface.

Cuando tenemos un fortigate sea el modelo que sea, normalmente se tiene un WAN1 y WAN2, sin embargo hay modelos que no cuentan con DMZ o bien, si cuentan con este puerto se requieren mas interfaces para WIFI, Anteneas o enlaces que queremos supervisar mediante el mismo equipo.

Para eso podemos convertir nuestro equipo de modo switch a modo interface, como se hace eso??

Aqui las pantallas.

Se cuenta con un equipo Fortiwifi 80C.

Lo primero es entrar al admin web, deshabilitar el DHCP y borrar la politica default que tiene el equipo, claro que si no esta de fabrica como el que muestro pues habra que borrar todas las politicas que tengas.


domingo, 25 de octubre de 2015

Milagro!

Cleanskin.....primera película que no matan a Sean Bean en los primeros 10 minutos !!!!!!

jueves, 30 de abril de 2015

Actualizar Galaxy S4 con Lollipop 5.0.1 Telcel Mexico

Este tutorial es para actualizar el Galaxy S4 de Samsung que normalmente trae 4.4.2 a Lollipop 5.0.1.

!!!!!   SOLO ES PARA VERSIONES  SGH-I337M   !!!!!

Mi telefono es Telcel de Mexico, a mi me funciono todo pero no quiere decir que a cualquiera le funcionara, asi que si vas a seguir es bajo tu propio riesgo y no me hago responsable de nada.

Este doc es solo como me funciono a mi.

NO HAY QUE BRINCAR PASOS Y NO SUPONER NADA.

Inicialmente hay que descargar en la computadora el KIES que es el software de samsung y es quien nos dara los drivers del telefono en el equipo.

viernes, 14 de marzo de 2014

Instalacion de XenApp Fundamentals 6 en Windows 2008 R2 Std

Instalacion y configuracion basica de XenApp Fundamentals 6


Encontre esta guia que me parecio muy buena, yo la segui y me funciono perfecto despues de tener varios
 problemas en la instalacion. Fue hecha por y al final pongo su liga directa, espero les sirva como
me sirvio a mi.

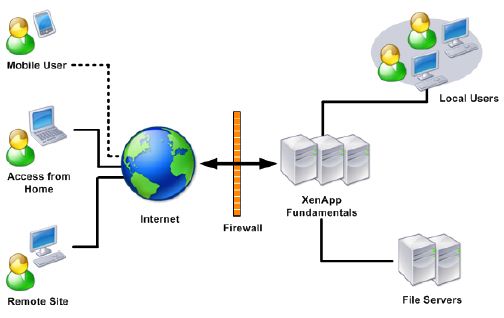
Citrix XenApp Fundamentals is a remote access solution that enables small to medium-sized business users to
 securely access their corporate windows applications and files from anywhere, either on LAN or at home,
with an internet connection. The applications are securely stored on a central server and delivered to users,
ensuring the utmost security of sensitive business data and reducing management costs. The seamless user
 experience and fast access make this product a complete app virtualization solution for business. For more info visit http://www.citrix.com/products/xenapp/features/editions/fundamentals.html


This guide is divided into two parts:
  • Step-by-step installation of XenApp Fundamentals 6 on Server 2008R2.
  • Basic configuration of Citrix XenApp Fundamentals.
System Requirements

1. XenApp 6 Fundamentals Edition must be installed on Windows Server 2008 R2 SP1. (Update your server
with latest patches).

2. Enable Microsoft .NET 3.5 SP1 on Server 2008 R2.

3. Install Remote Desktop Services (Remote Desktop Session Host and Remote Desktop Licensing components)
 on Server 2008R2.

[ Note: Do not install XenApp Fundamentals on a Domain Controller ]

Step-by-step installation of XenApp Fundamentals 6 on Server 2008R2

Note: If you are using Active Directory, add the computer running XenApp Fundamentals to the directory before
 installation. XenApp Fundamentals can be part of a Windows workgroup or domain. [In this example the 
computer running XenApp Fundamentals is a part of domain]

1. Log on to the server as a domain administrator.

2. Insert the installation media and click 'Install or run program from your media'


3. On the welcome screen click 'Install'


4. Accept the license agreement and click Next.


5. On the Installation type page select "Application Server" and click Next.


6. Now if you want to view and interact with xenapp users do not select 'Disable shadowing' and click Next.


7. Provide the domain administrator username and password for the SQL database installation and latter
management.


8. Now wait for the Citrix components to be installed.


9. The setup will prompt you to restart the computer to continue with the installation. Click 'Yes'


10. After the restart you will get 'XenApp Server Role Manager' console which says XenApp and Web Interface
 got successfully installed on your server. There we finish the installation of XenApp Fundamentals 6 on Server
2008R2.


Basic Configuration of XenApp Fundamentals 6


1. Go to Start > All Programs > Citrix > Management Consoles > Citrix Delivery Services 
Console.

Click 'Disable authenticode signature checking'


2. On the 'Select product and component' page select 'XenApp' and click Next.


3. Select the server by clicking 'Add Local Computer' and click Next.


4. Now check the summary and click Next.


5. Once the discovery has completed  click 'Finish'.


6. As soon as you click finish you will get a Citrix Delivery Service Console as below. This is the
 management console for Hotfix, XenApp Fundamentals etc.


Configuring Quick Start Options

7. Now go to Start > All Programs > Citrix > Quick Start. You will get a welcome page and click Next.


8. On the server configuration wizard select 'New Single Server' and click Next.


9. Now click 'Finish'.


10. As soon as you click finish you will get a console like below. Here we need to configure the Citrix license.
Follow the below link to configure Citrix licensing : http://support.citrix.com/article/CTX126387
Here you can also activate the Remote Desktop License Server by clicking the Remote Desktop License 
Server option at the bottom of the console.


From the same page we can add XenApp Administrators and also configure Email alerting by clicking
Administrators option on Setup pane.

To know how to publish an application and server desktop in XenApp server read

Bibliografia: guia directamente copiada de la pagina:
http://yadhutony.blogspot.mx/2013/04/installation-and-configuration-of.html